Well it has been way too long since my last post and I sincerely apologize. Life has been busy but I have been able to brew some, including a very tasty DIPA, and enjoy some great craft beers. For awhile I got caught up in a couple Facebook home brewing pages that seemed great but quickly became ugly with a small number of very opinionated and sometimes downright rude individuals that ruined what should have been a great online community of home brewers for a lot of us. Social media is becoming a great sharing and learning platform for home brewers and a way to further expand the hobby and I highly recommend brewers to checkout the different Facebook groups and home brewing forums. Granted whenever you get a group of people together there are going to differing opinions but I encourage home brewers to be open minded and respectful of others opinions and practices. None of us know everything and all of us can learn something and many things just don’t work for everyone and that is ok. The great thing about home brewing is that we don’t have to conform to style guidelines or the common practices of brewing, we can just have fun with it. In the end we’re still making beer and how great is that? Well it’s time to move on and focus on life and brewing.
My continued focus is small batch brewing because it just works for me. I’m the sole drinker in my household, not much of a local home brewing community to share with and it provides me the opportunity to brew more often while keeping a manageable amount of various home brewed beers on hand. Small batch brewing (less than 5 gallons) is also a great avenue for anyone with limited space. The one thing that is a big bonus with small batch brewing is that it opens the possibility of brewing with 120V heat sources and some amount of automation that fits with just about any home brewer’s style and or comfort level. Being an avid do-it-yourself kind of guy, with tendencies to over-engineer things, the mind has been working overtime coming up with ideas and projects that fit with my brewing style. For me half of the enjoyment of home brewing is the process and the DIY aspect of home brewing. I have been trying to design a relatively inexpensive (I’m an admitted bargain hunter) 120V based compact, space saving and versatile system that will allow me the flexibility to brew any beer anywhere I live and by any method that will make the process more efficient. Will I ever achieve that? Not really sure but I’m having fun in the process.
The latest project for me is perfecting my small batch electric single vessel system. While I really like my 24 quart Bayou Classic kettle with the custom stainless mesh basket I wanted to refine it some and add in some additional capabilities. It had respectable heating times but I figured I could do more, more to improve my brewing process.
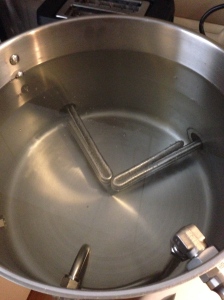
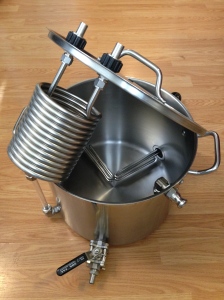
I had the opportunity to pick up a used heavy-duty stainless 24 quart commercial stock pot with an encapsulated tri-ply bottom for cheap so I snagged it. Heck one can’t have too many brew kettles can they? Well maybe you can but I’m sure a support group is out there for me so it’s all good. A few months earlier I also grabbed a couple 120V 1500W Heet-O-Matic elements for a “couldn’t pass it up” price, figuring there had to be something I could use them for and now there is. I had a couple 1-1/2” triclamp ferrules welded into the new kettle and drilled and tapped a couple triclamp end caps for the 1” NPT elements and the 120V 3000W brew kettle was born. The nice thing about the Heet-O-Matic elements is that they are stainless, have wiring covers and built-in thermostatic controls. Plugging each element in an outlet on separate circuits it was an easy way to get more heating capability and still use 120V. That is something anyone considering going to an electric system should consider. Most homes and apartments have at least two separate circuits in the kitchen and they are most likely GFCI protected and 20 amps. Almost like they were designed for home brewers like myself and not just someone with too many trendy kitchen appliances. Fine temperature control I currently plug one element into my PID controller and then when it’s boil time I just plug them into separate outlets. A new controller is in the works to control both elements. More on that later.
One other thing I wanted to redesign was my wort cooling method. I have been using an immersion chiller and it has done a pretty good job but with a heating element sticking across the bottom of the kettle it never was completely submerged. I also had to stir the wort to get quicker cooling times. Well after a lot of thought and looking at what other people are doing I decided to incorporate a chiller coil in the kettle lid and a whirlpool tube to recirculate the wort around the chiller coil all while being able to keep the kettle closed up during chilling. I was able to locate a very reasonably priced small stainless coil of 3/8” tubing off of eBay that fit between the kettle wall and the heating element so more of the chiller was actually in contact with the wort. Using compression fittings and some Blichmann Quick-Connect hose fittings I was set. Even though it is slightly smaller than my original immersion chiller it performs better when combined with whirlpool effect of the wort recirculation and when brew day is done it lives in the kettle. Saving space and when you live in a small home/apartment that is a great bonus. Another added bonus is that it can be used as HERMS coil to regulate mash temp in a separate mash tun.
The long, cold winter is here in Grand Forks and I’ll have plenty of time on my hands to do more work on things and brew. Stay tuned as I will continue to share as the kettle build progresses (I’m not done yet) and work on the two new control panels which are in the works. Here are a couple teaser shots…


Remember you don’t need a “fancy” system to brew great beer or spend a ton of money doing it but certain improvements in your equipment and processes can make brewing easier. Also to all you apartment dwellers thinking you can’t brew in your small space I’m telling you yes you can. You can do all-grain and you can have just as nice of a system as those with dedicated brewing rooms, it’s all dependent on how far you want to take it but small space brewers shouldn’t feel held back by their living arrangements.
Cheers.


Really like the chiller! Awesome idea!
Good to see a new post.
Ok…using my new system today for the first time. Now do you heat to a typical strike temp or heat to mash temp and then let the PID bring it back up to the set leash temp?
I use a calculator to figure what the strike water should be heated to based on grain temp and then once I add the grain I reset PID set point to what I want the mash temp to be for the 60-90 minutes. Then I put the lid on and start the pump recirculating
Do you use the whirlpool arm during mash recirculation? And I assume this is still a BIAB process? Nice idea with the integrated cooling in the kettle lid. I’ve seen that used for fermentation temp control, but not for wort chilling. Nice!
When I use this kettle for BIAB I have another plain lid with a recirculation fitting in it.
Beautiful work! Where did you get the coil/wort chiller?
Thanks. I found it on eBay. If you search for “hot water stainless coil” you should find it. The seller will sell the coil alone for less.
Gorgeous Kettle. Do you find that having the wort chiller in the lid, trapping the steam, affects chilling time?
Thanks. It really doesn’t have a negative effect on chilling times and it’s always a good idea to have the kettle covered during chilling to keep any nasties out of the wort.
Great article, sounds very interesting for apt dwellers, & great for the garage also.
I’m interested in keeping up on your progress & up grades, would like too try your brewing methods & equipment.
Johnny
Johnny, thanks for checking out the blog and subscribe to email updates to keep posted on my blog. I just posted the session I presented at Homebrew Con 2018, check it out. Cheers
great build!! i`m currently building one my own.
I wanted to ask how you bent your steel pipe for the whirlpool.
And what kind of glaspipe you used for that outside seetrough widow?
Paul
Hi Paul! Thanks for checking out my blog. The sight glass uses a piece of 1/2” OD polycarbonate tubing since it is easy to work with and resists heat. I bent the whirlpool arm with a tubing bender and a lot of patience lol. Brewhardware.com sells a couple different whirlpool arms and saves the frustration. Their Spincycle whirlpool arm is nice and he can do custom lengths